

How To Get Discontinued Lego Sets
How to make your own LEGO fix
Posted by ,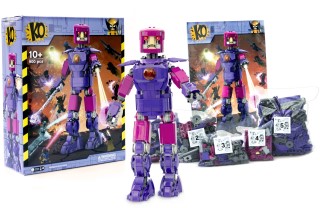
This article has been written by Kyle, owner and operator of KO Custom Minifigs:
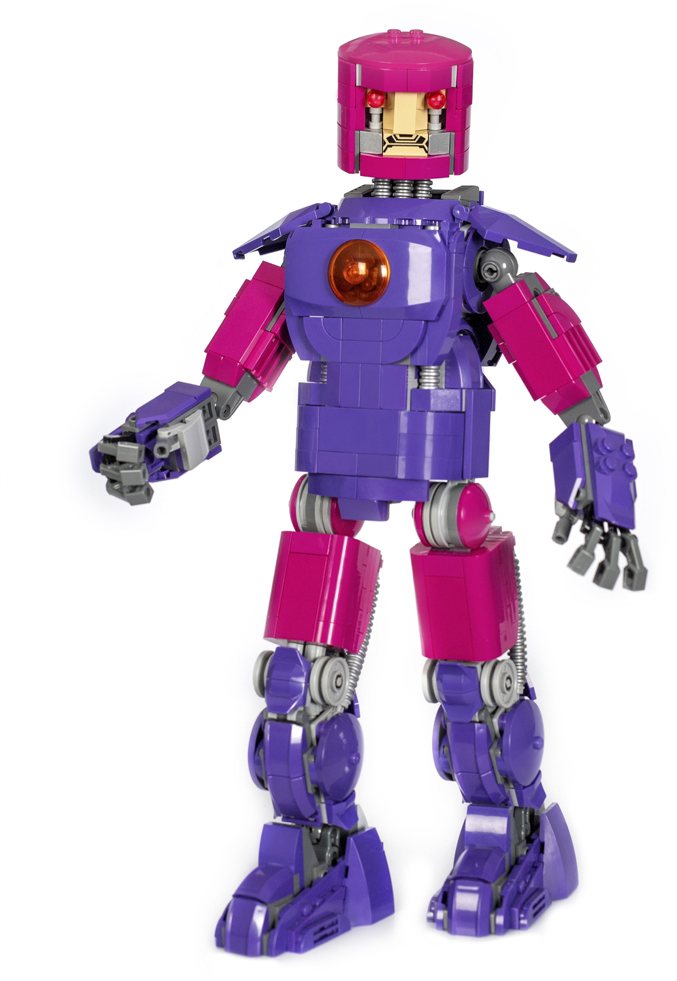
We recently took on a project to make what we have called our Mutant Hunter Mech edifice set. We are known for making custom LEGO minifigures, but this is the first fourth dimension that we have ever made a professional quality, custom edifice gear up.
The procedure was a lot of fun and I'd similar to explain how I did information technology and what I've learned along the way.
It all starts with an idea - One time you have an thought for a LEGO set that you'd like to design, gather images of your subject matter from all different angles. If the subject is something that appears differently across various forms of media, decide if yous will exist making 1 exact look, or if yours volition be a brew-up of different iterations.
.jpg)
I am not an engineer, but I take been building with LEGO all of my life. Having said that, the LEGO models that come out present are some of the most structurally audio models they have ever made. Long gone are the days of edifice a Star Wars ship that collapses in half while playing with it.
For this reason, I decided to look at recent LEGO Mech Robots when I began the initial phases of designing the MHM. Examining similar builds past LEGO's Primary Builders is a not bad fashion to ensure that y'all have a proficient understanding of the mechanics required to build your model.This is not to say that yous should copy existing designs - your model should still be your own work.
Examining LEGO sets that have a similar grade to your future model volition show you where to balance the weight or connection points. Yous tin do this by looking at the instruction manual of a model via a costless online PDF. Once you accept looked at a lot of these, consider ownership the set that is the nigh useful to your needs and build information technology then you lot can see how the model is stabilised in person.
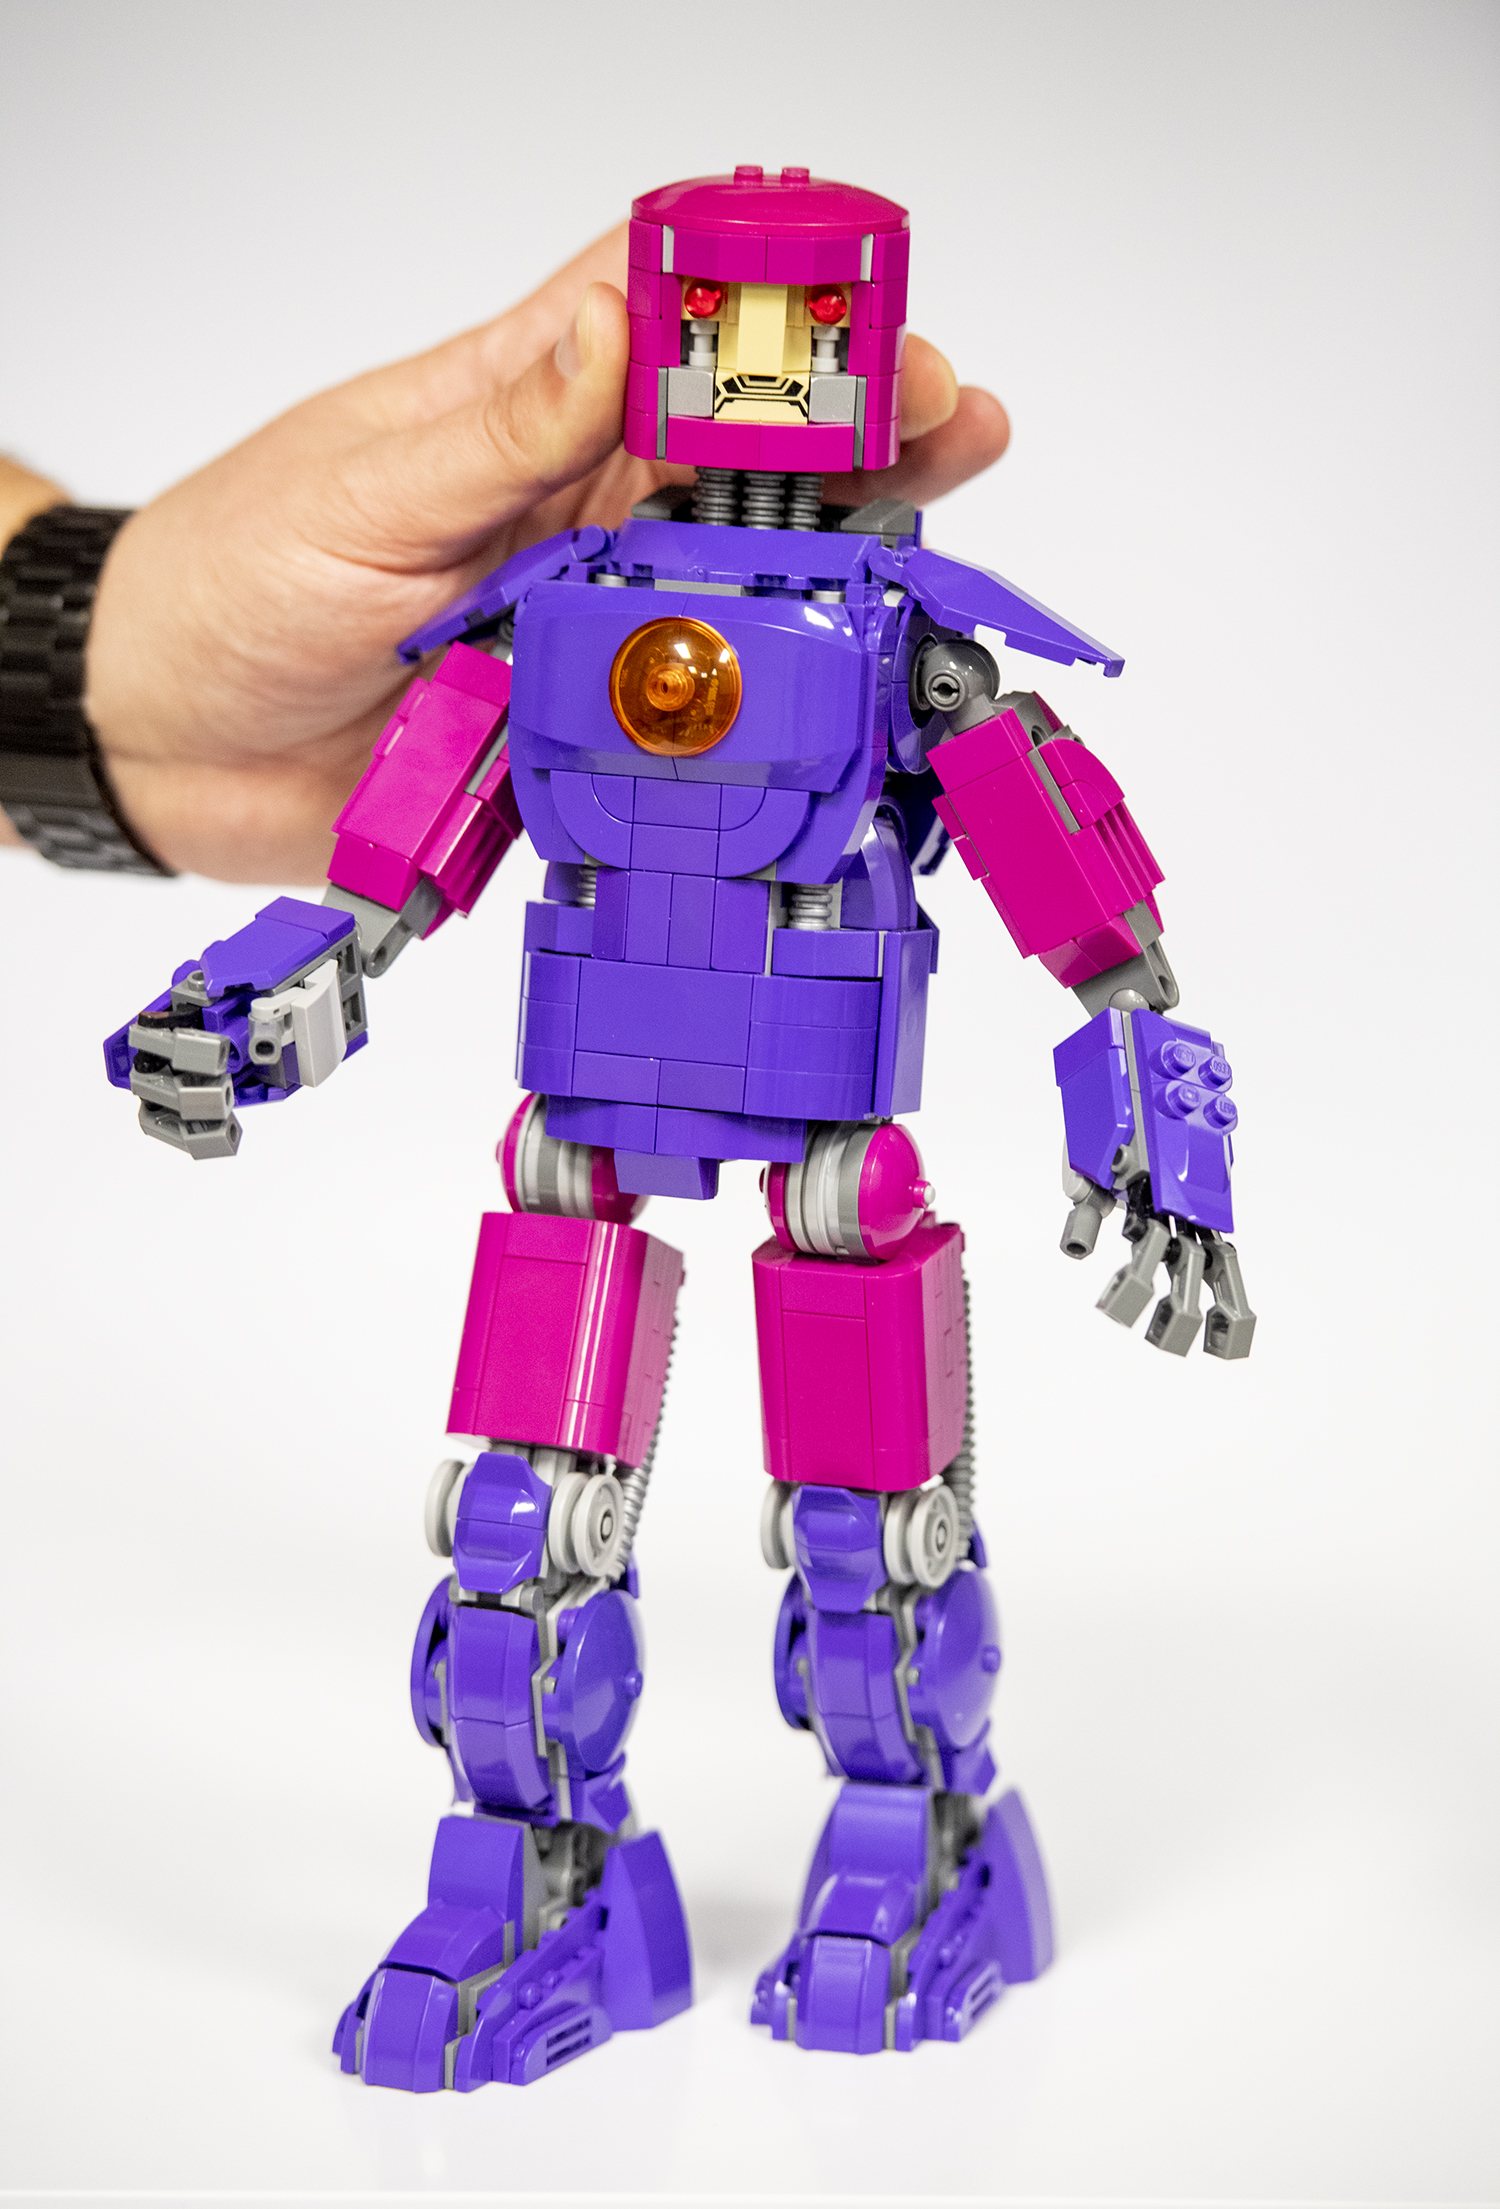
It is also a skilful idea to have a sense of scale in heed for how large or small to make your model. Yous wouldn't want to jump into things and realise it is non fix to minifigure scale or that it is way too big. Planning this at present volition save you time afterwards. For the MHM, I wanted the build to be fairly large, and have it be a very large size compared to a standard LEGO Minifigure. I decided to get with information technology beingness just about 12 inches tall, which allowed me to plan out how long each arm and leg should be.
Knowing this, I could then look about how long each sub part of the leg should be. This is important considering it determines how many parts tin can fit within the space and how you have to arrange them for stability and details.
If you're edifice something that relies on very specific colours, you should familiarise yourself with what parts are available in those colours. You lot can look into this on the colour tab on Bricklink.com, or here on Brickset.com, equally well as on the software Bricklink Studio. For MHM, the biggest challenge of the unabridged procedure, from designing and building, to sourcing parts, etc., was that a large amount of the parts used were magenta and night purple. These colours aren't bachelor for many elements, so it greatly limited the selection of parts to build with.
What features exercise you lot want your model to have? Before I started designing MHM, I knew that I wanted to accept a mode for the optics to lite up, and I wanted to brand information technology every bit poseable every bit I mayhap could, similar a giant action figure. Ideally, I wanted to take the translucent orange dish slice on the chest of the MHM light upwards equally well, merely it wasn't able to exist done. Notwithstanding, my core features of light-upward eyes and poseability were successful.
During the building process I realised I could include an additional feature, a connection signal within the MHM'southward hands that could exist used to adhere accessories. That's when I decided to include the "tentacle" whorl zipper every bit part of the gear up, only the connection point could be used for other interesting attachments like a brick built energy beam attack, or as a way to adhere a minifigure. You might see similar opportunities along your building process that allow you lot to add absurd, unexpected features.
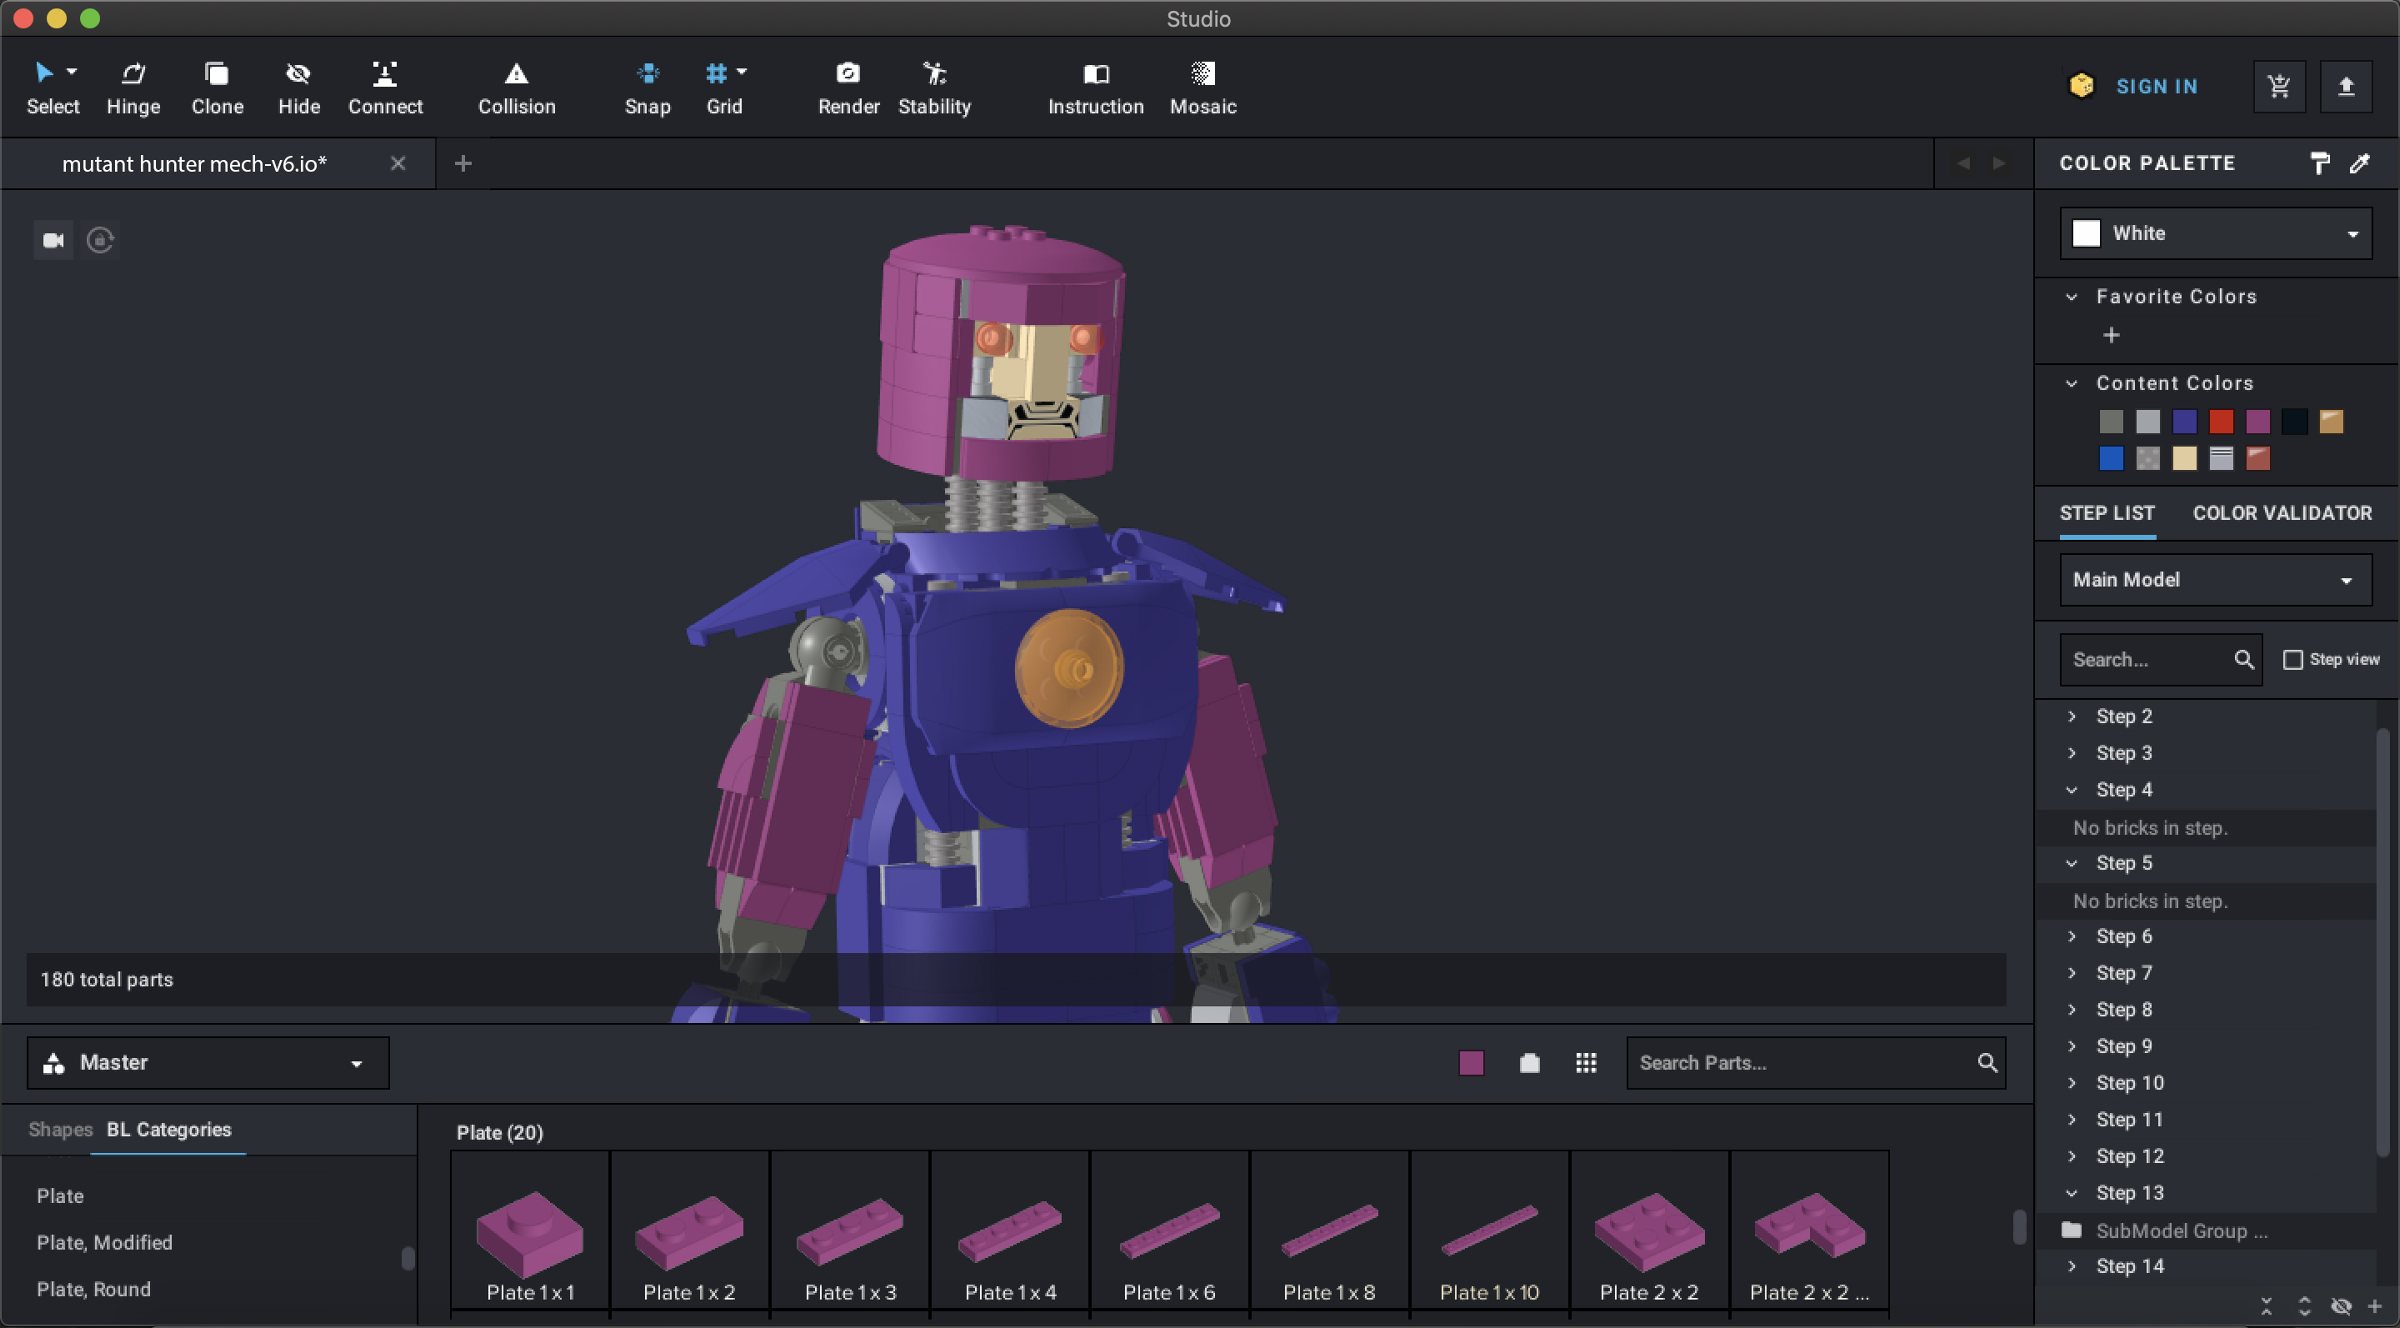
I would highly recommend using the software Bricklink Studio to build your own model. There are other digital building programs out there, only this is, in my opinion, the all-time selection. Bricklink Studio allows y'all to export an inventory list of the parts used in your build and then that yous can upload this list to your Bricklink account. And then you can buy these parts from Bricklink.com using this list.

If you are non familiar with Bricklink Studio or you lot oasis't used information technology much, you may want to watch some YouTube tutorials for it. There are so many keen features included in this plan.
Using Bricklink Studio, begin by building something that looks accurate to your reference images. Practise this one pace at a time. For me I started by building the anxiety, and so the legs of the MHM. I treated each every bit a dedicated model within a model, sculpting them to look as accurate equally I could get them. LEGO is known for its small details so endeavor to utilise that philosophy into your design. Y'all don't want to blitz through the building process.
Keep structural force in mind as you build on screen. Somewhen y'all will need to test this design with real parts to ensure stability. Digital building allows y'all to explore ideas, and experiment while saving time and money. Alternatively, if you tried to physically build out every option it would have significantly longer and would be far more expensive. Along the way, you volition about probable end up going back and modifying designs that you lot thought you had finished.
I found that while designing MHM, I would exist fairly happy with how something looked, merely afterwards reevaluating the entire model, I would go back and change something. It's a fluid procedure, but information technology's important to exist open to making these kinds of changes forth the mode. You don't want to lock yourself into any designs until yous feel the entire model looks as information technology should.
Try to condense your model where yous tin can. An obvious instance of this would be, instead of stacking three plates on top of each other, see if you tin utilize a brick. Nigh cases this will piece of work, unless the brick in question does not exist in the colour you demand simply plates exercise.
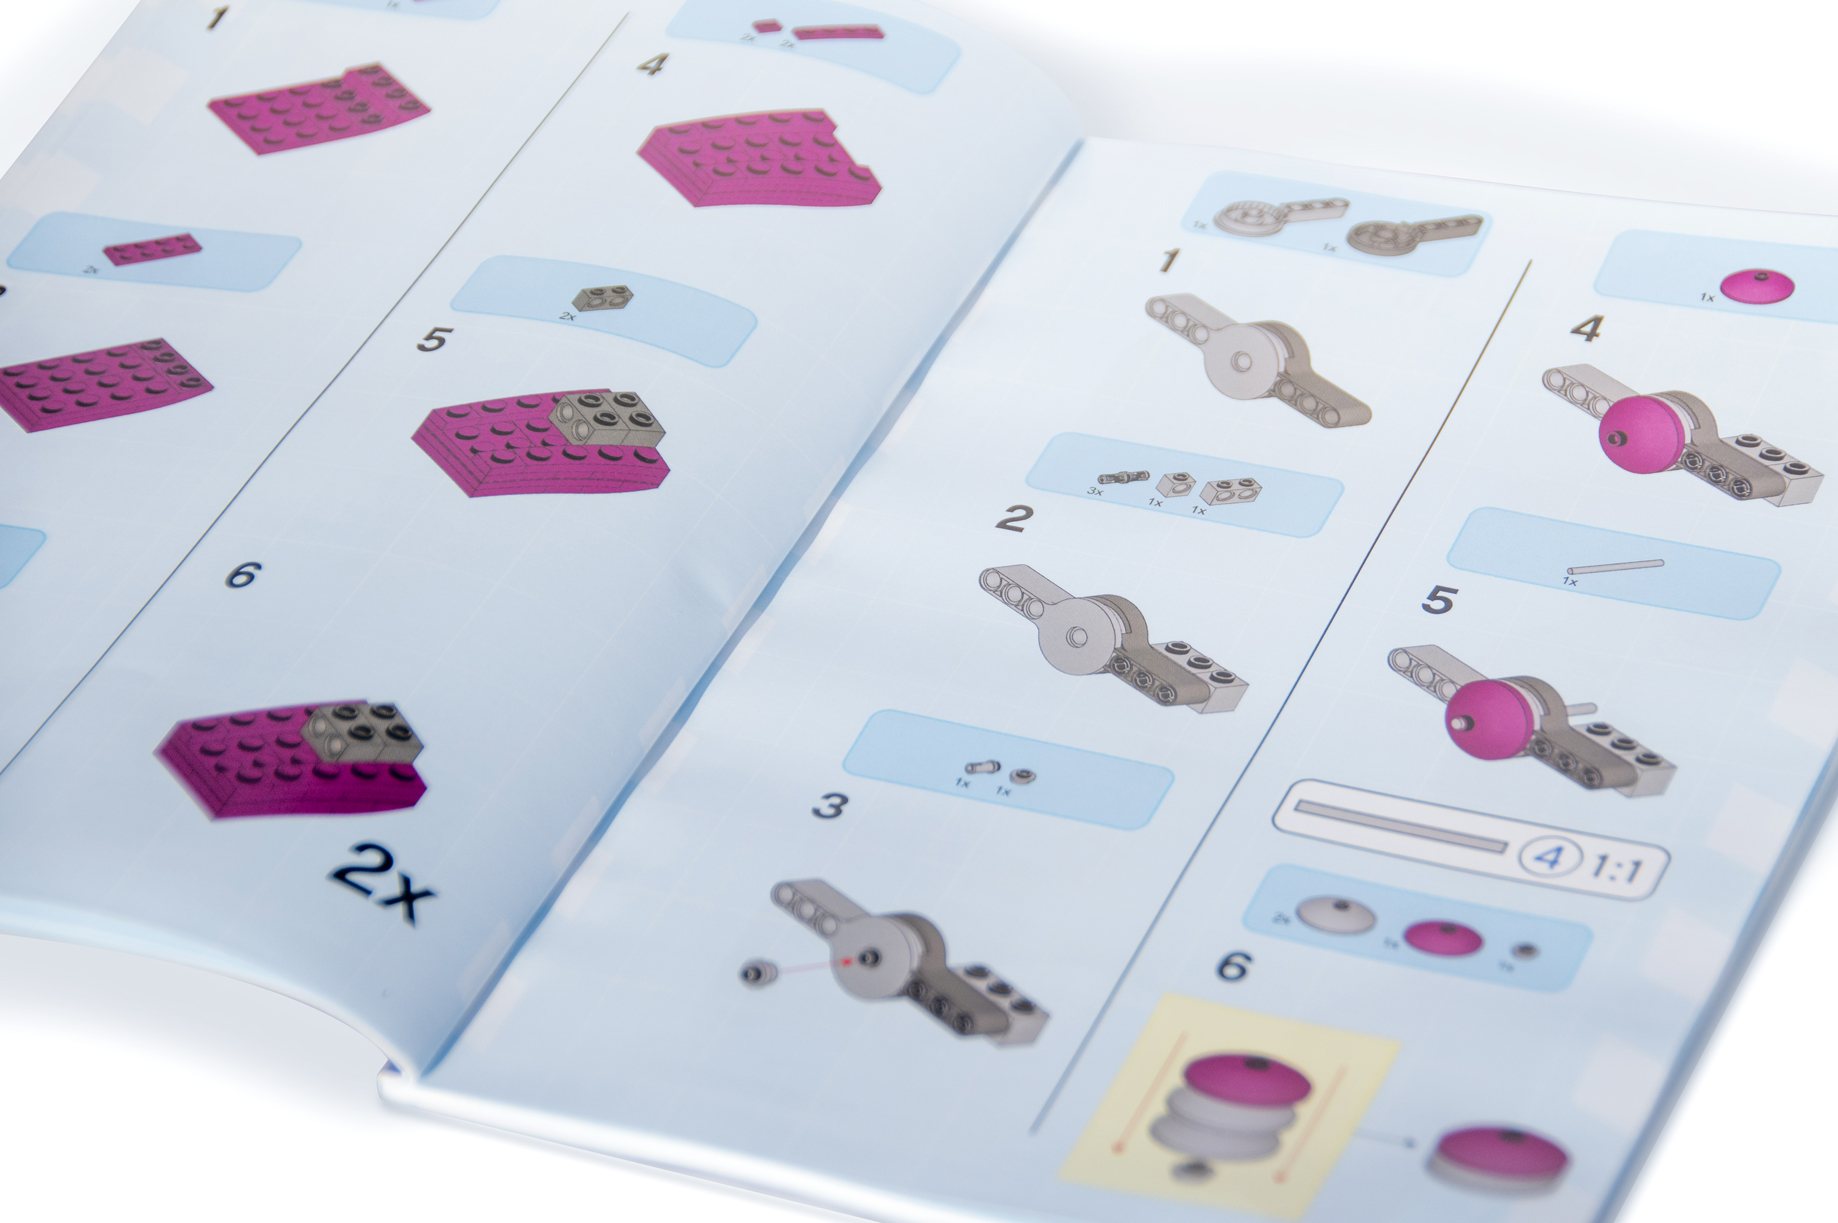
Bricklink Studio has a very well-made instruction generator, although it has a scrap of a learning curve to information technology. I had never used the software to brand instructions until at present. The master deviation is that you need to mark new steps every bit you lot are building. The way that I made MHM was that I designed the entire model outset, and once information technology was finished, I physically built the model with real parts. I then began the procedure of partially deconstructing modest sections at a time.
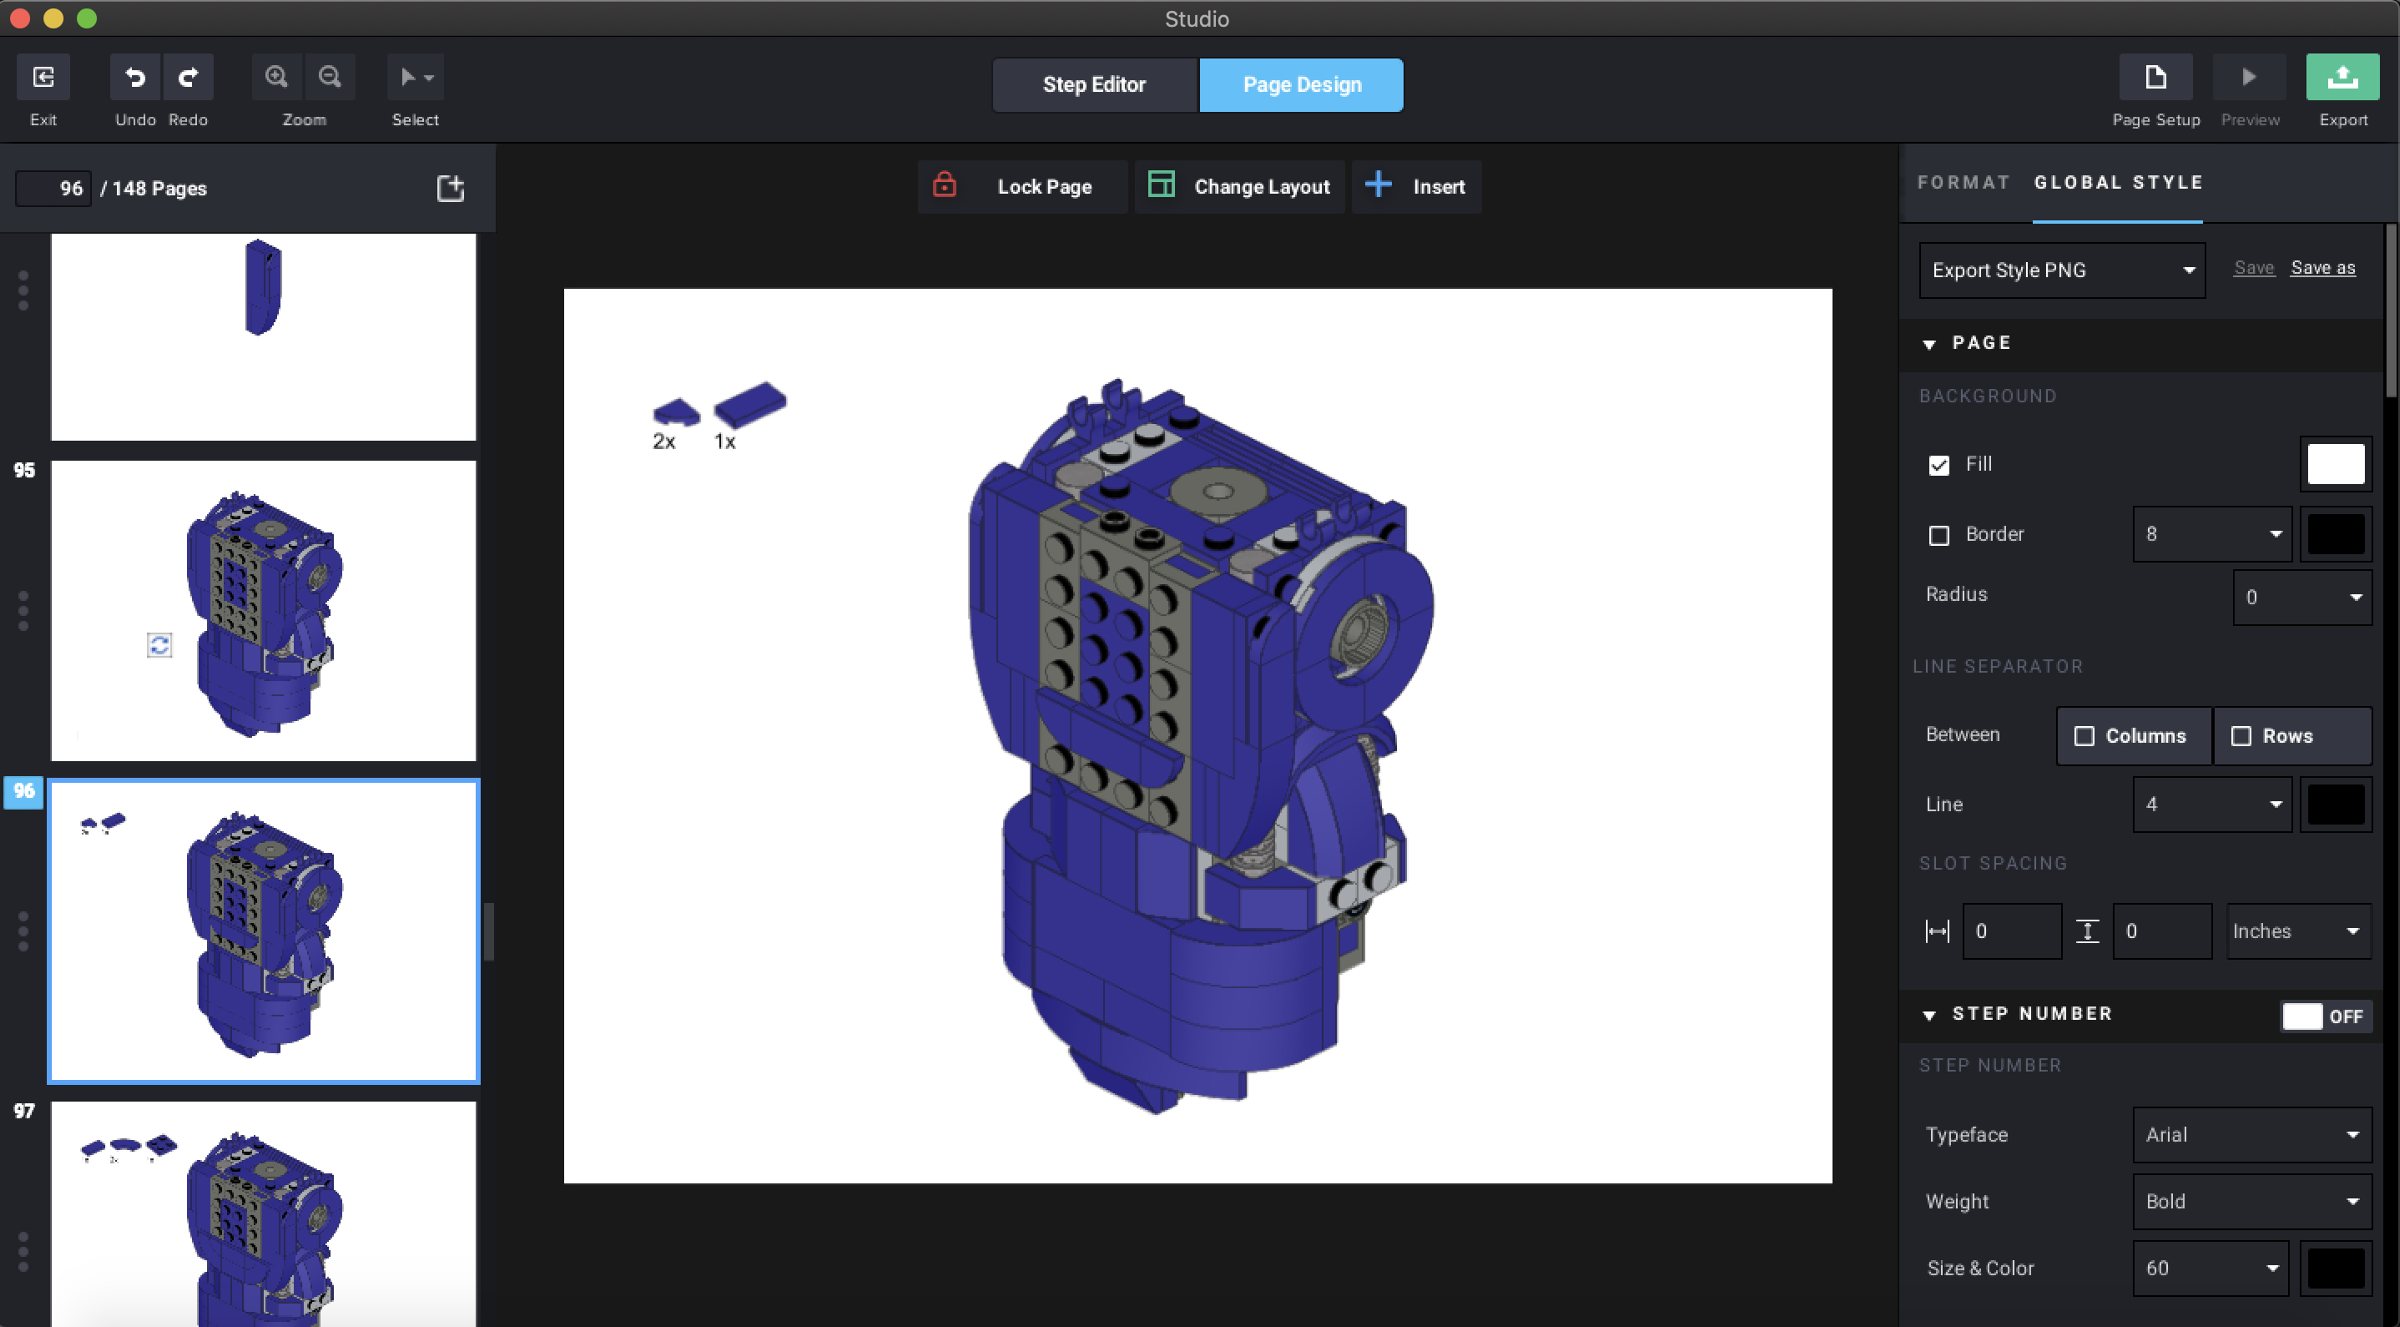
From these physically deconstructed sections, I would rebuild these areas by manus, as well as, simultaneously building them in Bricklink Studio. In Bricklink Studio, I would generate a new stride after adding about 5-6 parts into the onscreen build. Making instructions can feel very boring, but you wouldn't desire all of your hard piece of work to be lost now past making disruptive steps that the builder cannot follow.
Take this on one area at a time and in several sessions. Once you've got your steps seemingly making sense, impress them out and have a family member or a friend attempt to build your model. Annotation any area that confuses them or isn't clear. You may need to modify the bending showing the building pace or alter the order of the parts existence added.

You tin can utilise Bricklink Studio'south instruction maker to not only organise your building steps but besides blueprint the concluding look of your pages. I'thou not extremely familiar with this side of their editor merely there are several videos online that get over the settings to alter the look and layout of the page. I went a different route for my MHM set. Depending on your level of experience with graphic blueprint I would caution you to stick with Bricklink Studio's educational activity maker.
I wanted to brand a printed instruction booklet, then I was only using Bricklink Studio's teaching maker to generate the images I would need of each building footstep. Once I had the high resolution PNG images exported from Bricklink Studio, I so used Adobe Illustrator to design my bodily pages.
I was using a specifically sized template which included bleeds and safe areas. I downloaded the template from the printing company I was ordering from. If you get the road of making your own printed booklets, information technology is expensive and time-consuming. Exist sure that the images you're using are high resolution, and that the scale of parts is consistent throughout the booklet.
I had a percentage calculated out that I would scale each paradigm down to. Don't overload a single page with also many steps. Test that your pages are readable past printing out a page at home, at bodily size. If you but crave digital building instructions, you can export the instructions you've made in Bricklink Studio as a PDF file. Some custom models offering their instructions as a digital download or come on a USB drive.
You lot will desire to accept high quality images of your model to show the world. I would recommend taking high resolution photos of your finished model, confronting a manifestly white groundwork, or you could make a high resolution, digitally rendered image of your model using the render feature inside Bricklink Studio. For either approach, a static pose of your model is a good start, followed by other images that showcase its special features.
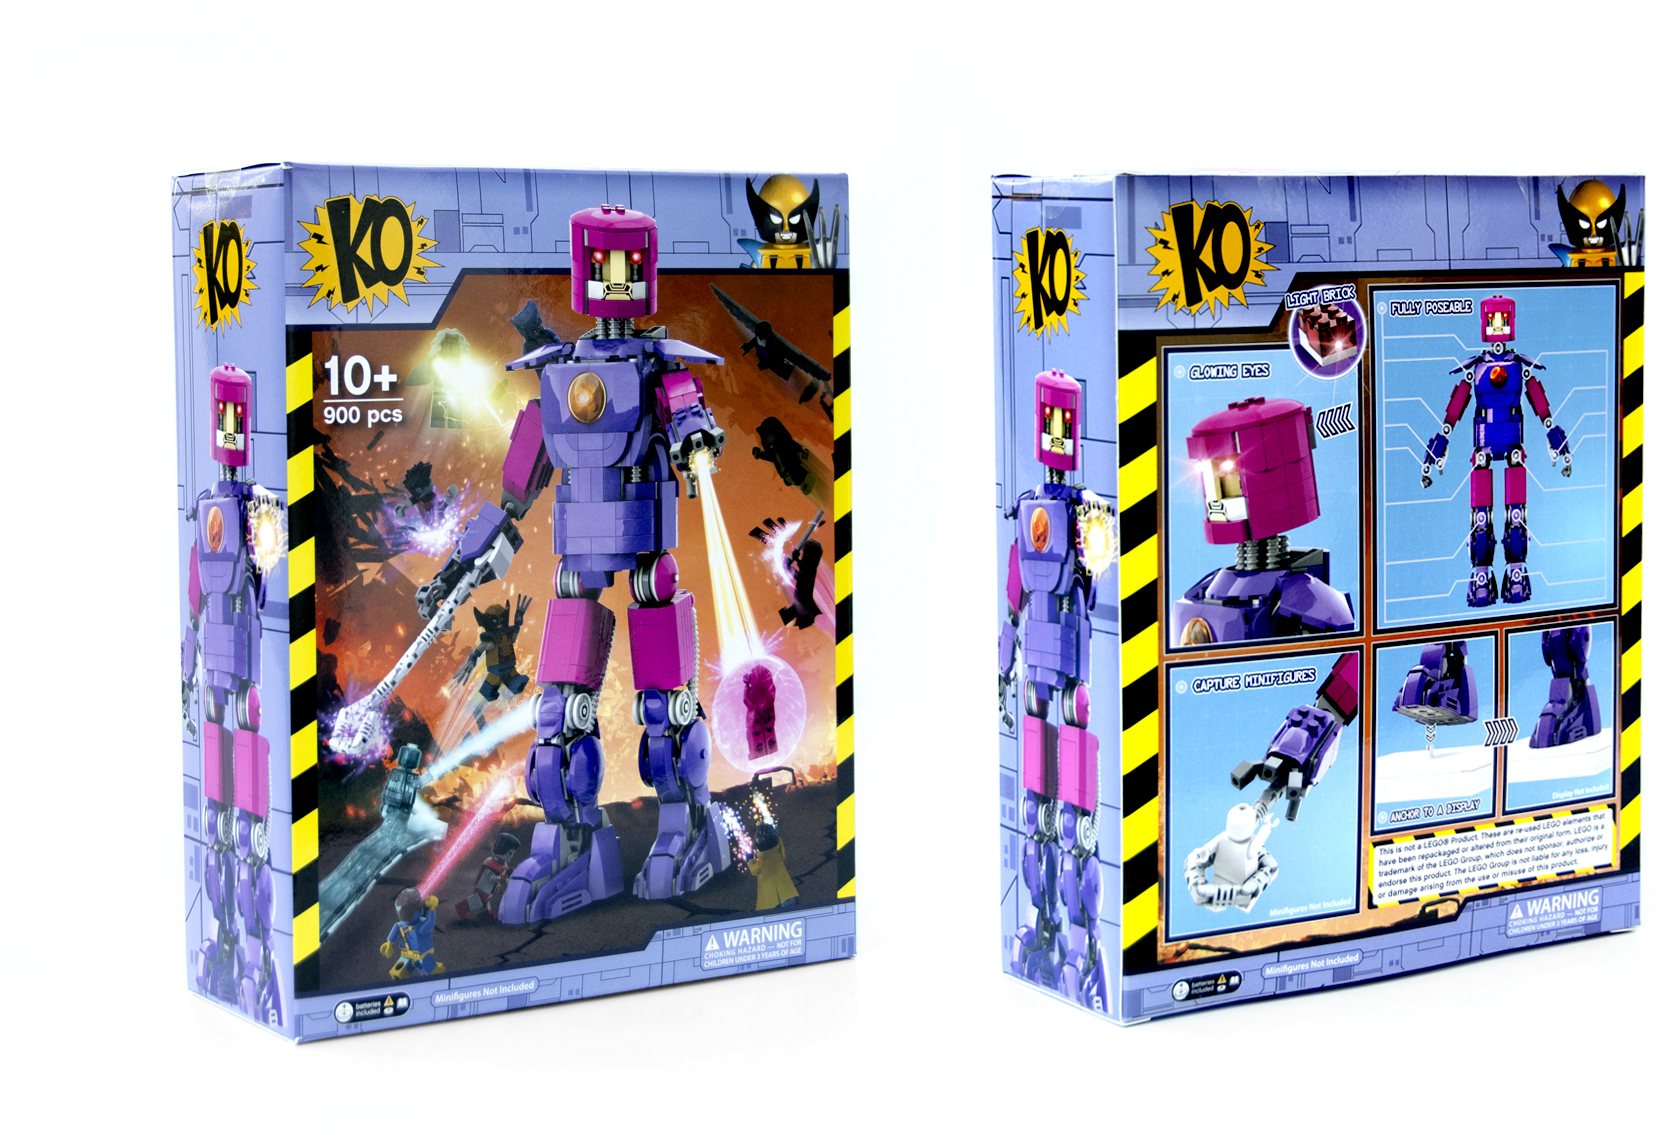
If you would like to go even further, and have a box printed for your custom set, I would caution you in a similar way about the costs and level of graphic blueprint feel before taking it on. However, for MHM I found a box press visitor online, and worked within a dieline template they provided. The dieline template corresponded to the specific box shape and dimensions I was ordering.
To figure out what box size I needed, I measured and trimmed a cardboard shipping box at abode. The dimensions factored in that the box had to comprise the printed instruction booklet, and the parts for the fix (which were separated into v bags for each stage of the build). I ensured this was authentic past physically testing that all components would fit. In terms of production, I likewise had samples of the box and the instructions printed up. This was to ensure that the colour levels were where I wanted them.
Printing in CMYK often makes your artwork announced darker, or more than blueish. If y'all are designing your own box/ instructions, bank check that your certificate'southward color profile is ready correctly to RGB (screen) or CMYK (print). Also, check for whatsoever other specific directions that the company you are using has for formatting your files or other settings. This can often be found on the company'due south FAQ section or by asking the company.
If you want to offer the total set, parts included in the box and fix to build, y'all will demand to source every part. I mainly have used Bricklink to source the parts needed for each set. I have also used LEGO'due south Bricks and Pieces service, only the availability of parts is often striking or miss.
The thing that I would stress the nigh is, if you lot program to provide the parts, before y'all finalise your model, begin printing X corporeality of copies of instructions, boxes, etc., double check that all of the parts you are using are readily bachelor to fulfil all of your sets. Sure parts might appear to be available to buy, but upon looking further only a handful of sellers might take them. This is more often the case for parts that accept only e'er appeared in one set, at low quantities in that set up.
Once more, this was more of a factor for MHM, due to the unusual color palette I was working in for magenta and dark purple elements. Once you take your set finalized, and are not using any elements that yous cannot buy, you lot can go along with the residuum of the process. To gild all of the parts I made multiple wanted lists on Bricklink. Ane list is the chief list of the original build, and other lists were majority ordering lists that had the quantity of each part multiplied past ten. Using Bricklink'south smart buy feature, and wanted list buying features, you can order parts and apply the order to your list to track your inventory quantities and encounter what is still needed.
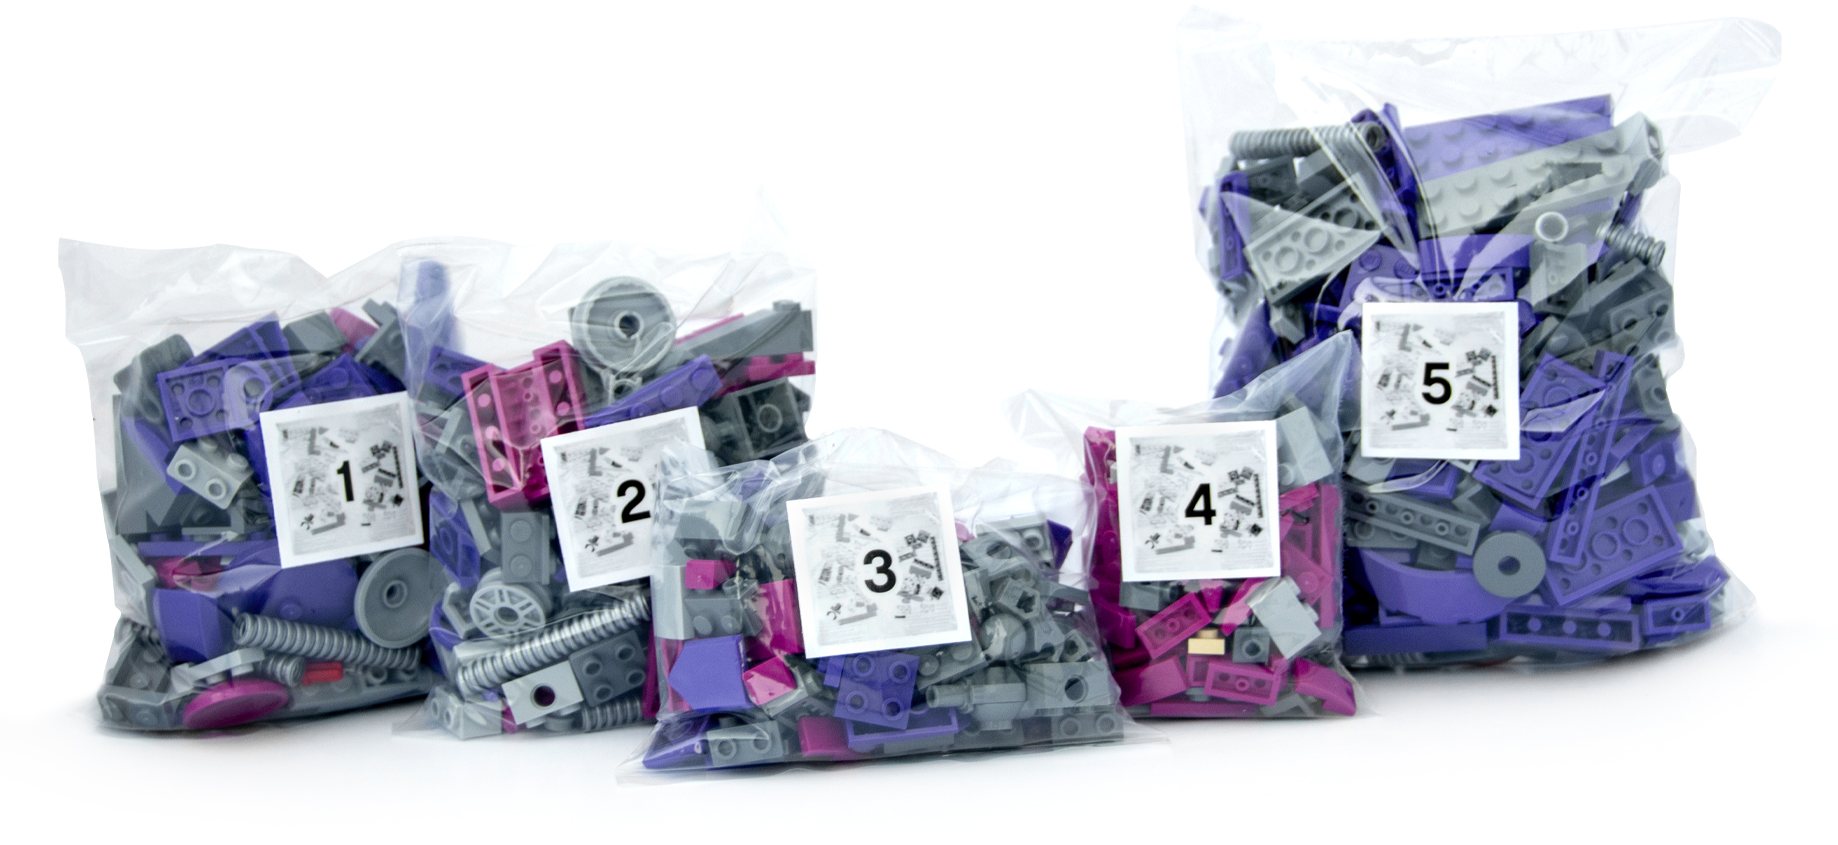
Finally, once you have the parts for your fix you will demand to sort them all out. I did this past sorting the parts into a few of the Akro-Mills sorting drawer bins. Each bin is labelled with what it contains. They are a not bad way to keep things neat and organised. To sort each bag, I accept a listing of the parts and quantity required, and I scan through the rows and columns of the Akro-Mills sorting drawers, gathering what is needed.
In one case I have all the parts, I double-check the lot of gathered pieces and advisedly slide the tray of parts into a plastic purse, which is then sealed with a heat sealer, and numbered with a sticker. One time the parts are bagged, they are and so packed into ane of our custom boxes, along with a printed instruction booklet, (which has been sealed in plastic wrap) and the set up is gear up to be sent out.
1 thing's for sure: creating your own LEGO set is a lot of piece of work, just a labour of love!
If you'd like to buy your own Mutant Hunter Mech, you do so at KO Custom Minifigs for $225.
98 likes

How To Get Discontinued Lego Sets,
Source: https://brickset.com/article/66046/how-to-make-your-own-lego-set
Posted by: colemanrefor1937.blogspot.com
0 Response to "How To Get Discontinued Lego Sets"
Post a Comment